
Sport Types Covered
Below on this page are the sport types that we cover
Road Running
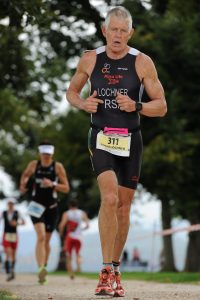
Man was created to run, so it’s a massive topic – already well documented.
Some tips for beginners:
- To avoid common injuries, warm up and stretch! Dynamic before and static after the run.
- Old saying after first injury: “probably too far, too fast, too soon”
- Keep weekly mileage appropriate to the race distances you are training for
- “Speed work” as applicable, e.g. “fartlek”, repeats on the track etc.
- Add some applicable resistance training: at least for quads, glutes, ham strings, calves, groin
- Uphill: use lower back muscles by twisting your spine. Careful of not over-using calves
- Downhill: arms in “locomotive mode” and faster/shorter stride for “rolling action”
- Level: land almost flat-footed with rolling action into conscious push with calves
- Rhythmic “mantra” for constant focus on style and chosen effort
- Relaxed face/shoulders/ arms/hands with slight “pump-action” for legs to “follow” arms
- Mind-set: expect dis-comfort/pain – “an endurance mind set”
- Pacing yourself sensibly is critical for races of all distances!!
Time Trial Cycling
Save those quads:
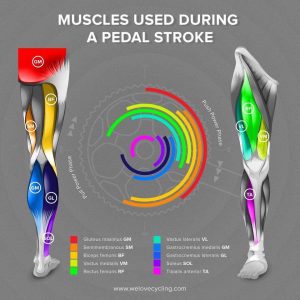
For maximal efficiency we should apply tangential force all the way around the pedal stroke – and not radial force. In simple terms this means my foot must apply forces evenly around the full circumference of the circular path, and not towards or away from the center of the spindle. That is the ideal, optimal action. So within the limitations of our human anatomy, here is how we can get closest to that:
The muscle group that provides the most drive on the bike is the quadriceps – by far. So one’s intuition is to use the quads only – distinctly aligned to the pedals of “ordinary street bicycles” (typically used for cheap transport) which are not fitted with straps nor cleats. So propulsion is 100% quads!
Ideally the competitive cyclist should try utilizing all other muscles cycling-linked muscles to the fullest – albeit that they only contribute partially.
Imagine the bike moving from left to right. Pedaling phases are expressed as per the 12 hour clock:
Typically the quads would be working from about 1 to 5 o’clock. This happens automatically/ intuitively, so we want to try consciously for all muscles to contribute as follows:
Rake horizontally backwards with the right foot (at the bottom) from 4 to 8 o’clock, while at the same time pushing forwards horizontally with the left foot (at the top) from 10 to 2. After some (counted) strokes, reverse the action by just switching legs – i.e. raking left while pushing right. Let’s say 20 strokes on each side each (choose the number that feels best).
Now pull with the right foot on its up stroke from 7 to 11 while the left foot relaxes on its down stroke from 1 to 5. And pull left while relaxing right. Let’s say also for some 20 revolutions. Note that unlike the rake/push where you do it “lob sided” for a number of strokes at a time, this action can be done on every up-stroke of every revolution – just with alternative legs, employing the hamstrings.
Consciously focus on never pushing down 1 to 5, because this is intuitive – it will still happen and (belief it or not) will still remain your main source of power.
Result? You go further and faster without overloading the quads as your major source of power. Towards the end of a hard ride you will need those quads anyway, and in duathlons and triathlons you will need those quads for the run!!
The bunny-hop refinement:
The “bunny-hop” technique deploys the principle of utilising some “non-cycling” muscles, (i.e. calves and triceps) to elevate your body against gravity to a higher level – i.e. storing potential energy, and then converting this stored potential energy into kinetic energy (which propels the bike) – all while saving the quadriceps (our main muscles for cycling).
As follows: when the right foot gets to 6 o’clock on the bottom, you use the right calve and both triceps to push/bump the body upwards. When the right side pedal gets to about 2 o’clock, you straighten that right leg and let your body weight utilize gravity to push the pedal back down to 6 o’clock – with as straight a right leg as practically possible.
Same on the left side – on every stroke.
Obviously this (counter-intuitive) movement cannot be done at high speed, so we are looking at cadence below 60 rpm (either using a high gear or mostly while going uphill). Of course this is an almost weird movement, but it saves the quads for later in the ride – and for the run when doing a triathlon or duathlon.
Immediately after every short phase of intense power output via a bunny-hop, you need to give your quads some special rest (because you would still have used them to an extent in the 1 to 5 o’clock range – no matter how hard you tried not to!) so you rest them completely by only pulling upwards 7 to 11 o’clock with both legs alternating – on every stroke.
Doubting our bunny-hop theory? Test it experimentally – quantifiable in Watts:
Do this experiment not on the road but on the indoor trainer, and watch the power output doubling for that short duration of bunny-hop. Do 2 identical rides of about 20km on the IDT with and without about 10 bunny-hops each, and expect to see an increase of at least 10% in average power output.
Angle of the hips - position of the saddle:

The more upright a cyclist, the stronger he can propel himself with the glutes and thigh muscles (quadriceps). Unfortunately we frequently have to lean forward to reduce wind resistance, which reduces the angle between hips and legs. One way to affect that (albeit in a minor way) is by shifting the saddle and handle bars forward. The formal limitation for that is something like “front tip of saddle no more than 50mm ahead of center of spindle” – for triathlons. (For cycling time trials that happens to be 50mm behind!)
So we ascertain what the latest formal rules of triathlon and road cycling time trials are, then adjust our saddles as far forward as possible – within those rules. We can even add another bit to that by buying a stump-nosed saddle and a fast-forward seat post! Let’s utilize this (albeit minor) additional advantage.
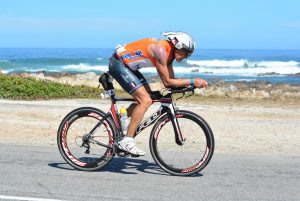
Using TRI bars:

Wind resistance increases with the square of speed – not linearly like our minds naturally tend to expect. Example (assuming no tail or frontal winds): at 20 km/hr your wind resistance will be 20×20 = 400 “units” of resistance. At 30 km/hr it will be 30×30 = 900 units. At 40km/hr it will be 40×40 = 1600 units!! So: from 20km/hr to twice the speed at 40 km/hr your wind resistance is four times higher!
In a typical cycling race we ride in “the bunch”. We do that by riding close behind the bike(s) in front of us and that way “draft” to reduce wind resistance. In triathlons and time trials, however, that is not allowed, hence the use of “TRI bars”.
When bending forward the angle of your hips is reduced, which causes substantially less power from the quadriceps and glutes (the dominant muscles propelling us forward). We should therefore only be lying down on the bars when wind resistance becomes significant. These conditions are typically in a headwind or going down-hill. Opposite conditions typically not applicable for lying down: in a tail wind or going slowly up-hill.
Reality is that many triathletes and duathletes will fanatically cling to those bars – as if this is incorrectly seen as an absolute “must” – so sad. Triathlons route are usually either circular or out-and-back. It is therefore obvious that along the route the need of tri-bars wil vary. In fact: with a strong wind from behind, sitting up straight like the sail of a yacht is even better!
The optimal solution: get used to judging relative wind speed by “feeling it in your face”, and looking around at vegetation, flags, clothing, etc. be aware of wind direction.
Open Water Swimming
“Swimming is not about propelling yourself forward in the water. It is about drag reduction” (quoting the founder of Total Immersion). Swim Smooth calls it “the Arni” style: fighting the water is inefficient.
Swim technique is widely documented, so we shall deal with this in summarised fashion only:
- Apply the basic recommended form in a pool while using aids such as snorkel, pull buoy and small fins. Have someone take videos and compare this with the ideal form.
- Gradually ween yourself from the use of these aids, setting realistic targets for swim speed.
- Phase in ocean swimming, avoiding windy conditions at first.
- Ensure all along that you do not loose form!
Enough to get going. Gradual improvement from here by experimenting with buoyancy (using wet suits with long pants), slip streaming, extreme windy conditions, “around the buoys”, entering/exiting in big breakers, breathing both sides and intermittently, developing “ballet feet” etc.
Duathlon/Triathlon

Huge topic. These multidisciplinary sport types require combinations of focus. Instead of a comprehensive “how to” (all well documented elsewhere) we shall rather refer you to the list categories, from where you might want to shoot questions of sorts at us, as these trigger the mind:
- Genetics and experience: Some of us are “born to run”, some of us are weirdly built for swimming, our historical background… Let us accept that we all have strengths and weaknesses, and plan objectively on working around that!
- Tapering before races: This will vary between the disciplines. Example: your “thumping” running requires much sooner tapering than would swimming, and even cycling. Rule of thumb is: taper the disciplines at varying rates, considering your own body. And taper in line with your level of fitness.
- Transition One: after a swim, sometimes practice taking off your wet suits and jumping into cycle gear. Some races have “wet-suit strippers” which are much faster than you can do it yourself). Experiment with powder, hair conditioner … Dry yourself when required, or wear bike pants and top underneath the wet suit (weather permitting). Each race is unique in many ways.
- Transition Two: “Jelly legs” is a favourite complaint from newbies to TRIs. The so called “brick-training sessions” imply doing a proper run after a bike ride. No need for that though: just do a short/fast “run-off-the-bike” after most bike rides. Beyond the physical advantage of less “jelly-legs feeling” you have that massive mental advantage of “having done this during training” at the start of the run! So much so that you must carefully monitor the first few km for not going too fast!
- Gearing: so sad to watch novices struggling to get going in the wrong gear! Select the right gear for start of the bike upfront.
- Cycling shoes: Getting on and off the bike “on-the-fly” has its advantages and disadvantages. Experiment at home with what works best for you.
- Memorise: your bike position, the changing areas, the routes in and out, your bag’s position and numbering … fatal seconds becoming fatal minutes.
- Nutrition: read up, talk to others, experiment during training, get to know yourself. When in doubt, stash back-ups in pockets. Think scientific yet pragmatic.
Paddling (rivers and ocean)

“Boats” of sorts – the simplistic basics: the two main categories of boats mostly used in racing in SA, would be K1/K2 (rivers) and S1/S2 (ocean). The main difference is K1 (for 1 paddler) and K2 (for 2 paddlers) are called “sit inside” and S1/S2 is “sit on top”. When a river boat capsizes, you swim it to the land and empty the water out before proceeding. When an ocean vessel capsizes, you climb back in and start paddling right away to have the water draining from the boat.
Paddles: for last about 30 years the “wing” had taken over from the flat. Length is to fit the paddler, and “feathering” Left/right off-set is an ongoing debate. Mostly light weighted carbon/glass combos.
Join a club! Like every other sport, you will simply learn much faster – and meet great people!
Free Diving and Spear Fishing

“Apnea” means holding you breath. There is a whole sport around this topic. Competitions are typically to determine who is best at: breath holding while static, swimming furthest underwater just below the surface, swimming straight down to as deep as you can but swimming back on your own, swimming down as deep as you can and coming back by other means ….
Physiologically not as simple as it sounds, e.g. when you go deeper (to higher water pressures) there is an increase in water pressure on the mask/goggles, and a “blood shift” from the limbs to the lungs, and …. This makes for interesting reading, even if not practiced!
Spear fishing simply means free diving while hunting. Regulations such as licences need to be taken care of, but also some ethical issues – such as not to kill rare species, not to shoot fish with SCUBA gear,… Great sport, though dangerous. Several competent “spearos” have lost their lives from “shallow water black-outs” and the likes – Tony Dicks, Dirkie van Bergen …. (When at depth and a huge fish stays just out-of-range, the temptation is to wait a while longer.) So, before jumping into the ocean with a spear gun, ask us for references to more info, or research it by yourselves.
Resistance training (“gymming”)
Again, this is a massive topics which we dare not profess to document on this little web site!
We shall endeavour to provide only concise summarised guide lines, and encourage you to contact us for specifics, or research the topic by yourselves.
“The truth I’ve discovered is that you don’t have to lift enormous weights to grow muscle. By using stricter form, slower negatives, and stretching between sets you can get an incredible pump in all your workouts. Numbers are an abstraction, especially to muscles. Your body doesn’t know the absolute weight of what you lift, it only recognizes how heavy it feels. The secret is to make lighter weights feel heavier.” – Frank Zane
The very basics of resistance training:

What does resistance training do for us? – joints, muscles, bone density, balance, reflexes, en little “incidental aerobics”!
Overload and Rest: Muscles grow when they get overloaded and then given time to rest – needing typically about 2 days for recovery.
How do we overload a muscle? Either by doing lots of repetitions, or by doing lots of sets, or by using more weight.
How do we know when a muscle was properly overloaded? When we experience DOMS the day after. (Delayed Onset Muscle Syndrome is a fancy word for “stiff muscles”.) Unfortunately overloading fit muscles becomes increasingly tricky the fitter they become – much like a fit runner does not get stiff muscles after a minor run (like an unfit runner would). So, on alternative days we train other muscle groups that had not been trained for some time – i.e. “unfit muscles” – so we can overload them in turn.
Form: We try to “isolate the muscle”. This means we make mainly only that muscle group work and do not (intuitively) help it along by employing other muscles, such as twisting, jerking. We also exercise the muscle over the full reach of movement, and not moving it for part of its reach only. Try consciously to do “the negative” slowly, because that’s where over-load is mostly happening (even when you “cheat” a little on proper form when doing “the positive”) e.g. the bicep curl.
The idea is to do the last repetition “to failure” – meaning you are unable to do one more.
Time economy: In-between sets we need to give the muscles a while to recover before doing the next set. Instead of making phone calls or chatting with others or admiring ourselves in the mirror, we immediately do another set of a different muscle group. Panting a little? – That’s good news because this way we also get little incidental cardio training done.
Further to the time-saving issue: mostly the “compound exercises” are preferred about single limbs type – meaning lifting with both arms or both legs at the same time.
Some nasty advice for understanding technique better: learn from the mistakes of others. Sometimes just glance at others in the gym and “critique” them quietly by yourselves. You will be astonished by how incorrect/inefficient/dangerous the average trainer is – actually so sad.
Food for muscle growth: you can spend a fortune on the latest fad and show it off in the gym in a huge coloured container that looks like something from a space ship, or you could simply have some high protein intake soon after your training session. Milk whey (a by-product from the cheese manufacturing process) is easy to absorb and for sale in powder from. Read the label and opt for the high protein (and low carbohydrate) content. Easily dissolves in water and comes in various tastes. Once back at home, eat high protein food soon: Generally lots of green vegetables, low fat milk, yoghurt, cheese, meat etc … the usual “good foods” – that we all know anyway.